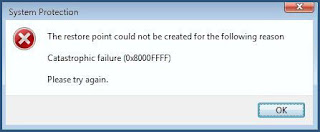
If your computer is running extremely slow, or you are not able to fix the problem after running different security scan, then you can choose system restore option to fix the problem. System restore will help you to undo all the recent changes that you have made to your computer without affecting and any personal files. However, if you receive any error while restoring your windows, then it will be a very difficult task to fix the problem. ”0x8000FFFF” is one of the errors that you might face when you are trying to restore your system by using system recovery options in Windows 7’ Computers. Read the blog to know more about this error and learn the advanced troubleshooting steps to fix the problem.
Scenarios
System restores fail due to many reasons. Below are the few most common scenarios in which system restore tool might fail to work.1. In Windows 7 you might face the problem if you create a system restore point by using the ‘System Restore’ tool.
2. Windows might show the error if you start the computer with the help of corrupt ‘Windows installation media.’
3. You might face the problem if you start your computer in ‘Windows Recovery Environment.’
4. Windows will show you the error if you are restoring your machine from the restore point that you have created by using ‘System Recovery Options.’
Advanced Troubleshooting Methods to Fix “0x8000ffff” Error
Troubleshoot Method One:
Install ‘Windows (AIK) Automated Installation Kit, for ‘Windows 7’ on the computer.
‘Windows Automated Kit’ is a list of tools and documentation that support the deployment and configuration of computer Windows operating system. Windows AIK helps you to automate Windows installation, configure and modify images using Deployment Imaging Servicing and Management, capture Windows images with ‘ImageX.’
Windows ‘(AIK)’ also helps to migrate user profiles and data with the ‘User State Migration Tool’ and thus provides way, to create Windows ‘PE’ images.
Read the below guidelines to install Windows (AIK) Automated Installation Kit:
1. Go online and visit ‘Microsoft’ official website.
2. Search ‘Microsoft’ download center in the prime search option.
3. Type ‘Windows Automated Installation Kit’ for ‘Windows 7.’
4. You need to download the ‘ISO’ file first to install the ‘Windows AIK.’
5. Write the ‘ISO’ file to a ‘DVD’ with the help of any third party tool.
6. Install the ‘Windows AIK’ from the ‘DVD.’
Troubleshoot Method Two:
1. Create the Windows RE image.
Creating ‘Windows RE’ image requires advanced technical knowledge. You can create ‘Windows RE image’ on your own if you are an advanced computer user. If your technical knowledge is not sound then, it’s advisable to contact computer support firms for quick online technical support.
Read the below steps to create Windows RE image:
A) Click ‘Start.’
B) Click ‘All Programs.’
C) Then click ‘Windows AIK.’
D) Type ‘CMD’ in the search box.
E) Right-click ‘Command Prompt.’
F) Then click ‘Run as administrator.’
G) Copy the ‘Install.wim’ file from ‘Windows 7’ installation media to a folder. You can do this with the help of following commands.
“md C:\OS_Image
md C:\OS_Image\mount
copy D:\sources\install.wim C:\OS_Image”

H) Use the ‘ImageX’ tool to open the ‘install.wim file.’ To mount the file, use the following command.
“ImageX /mountrw C:\OS_Image\install.wim 1 C:\OS_Image\mount.”
I) Run the following command to copy the Windows ‘RE image’ from the mounted ‘Windows 7 image’ to a folder.
"md C:\winre
md C:\winre\mount
copyC:\OS_image\mount\windows\system32\recovery\winre.wim C:\winre\”
J) Now follow the command to unmount the mounted image after you copy the Windows RE image.
“ImageX /unmount C:\OS_Image\mount”
2. Install the ‘Hotfix’ on the ‘Windows RE image’ with the help of below mentioned steps:
a) Open the ‘Winre.wim’ file that you have just created. Use the following command for the same.
“ImageX /mountrw C:\winre\winre.wim 1 C:\winre\mount”
b) Now you need to install the ‘Hotfix’ on the mounted ‘Windows RE image’ and then run the below command for the same.
“Dism /image:C:\winre\mount /Add-Package:c:\TEMP\Windows6.1-KB2709289-x64.msu”
c) Now check whether the ‘Hotfix’ is installed successfully or not with the help of the following command.
“ Dism /image:C:\winre\mount /Get-Packages.”
d) Make changes to the ‘Winre.wim’ file through the following command:
“ImageX.exe /unmount /commit C:\winre\mount”
3. Create a customized ‘Windows RE medium’ with the help ‘Winre.wim file.’ Use the below guidelines for the same:
a) You need to create a file to make a Windows RE image and you can do this through the following command:
“copy.cmd amd64 C:\WinREx64”
b) Now copy the ‘Winre.wim file’ to the ‘ISO\sources folder.’
c) Then rename the file as ‘Boot.wim’ and for that use the following command.
“copy C:\winre\winre.wim C:\WinREx64\ISO\sources\boot.wim”
d) Now install the customized Windows RE image to any media.
Check whether the problem has got fixed or not. If not, then it might be possible that a few applications, programs or services of your Windows have not installed properly. In this situation calling computer support companies for technical support will be one of the best options to go.
Conclusion
“0x8000ffff” is a critical error, and it can take place due to numerous reasons. You might face the problem due to corrupted registry files, unnecessary temporary files, improper system settings or a malware/virus infection. If you are not able to fix the problem with the help of above mention guidelines, then you can contact online technical support firms for further tech support. Tech support engineers will go ahead and help you out to fix the problem with the help of advanced troubleshooting steps.


No comments:
Post a Comment