Monday, 30 March 2015

How to Ensure Online Security With DNSCrypt In Linux OS?


Numerous online scams and cyber crime cases are forcing you to encrypt web traffic to avail optimal online security. Since virtual attacks can result in data, financial, and personal information loss, securing DNS servers are becoming highly important for every Internet user. DNSCrypt, a latest service by OpenDNS, is a protocol that is specially developed for securing web traffic between a client PC and a DNS server. Installing the special security tools can help you prevent various DNS attacks including spying, spoofing or man-in-the-middle attacks. Out of all the leading computer operating systems, Ubuntu is one of the more secured and protected OS platform.

You can install dnscrypt-proxy on Linux OS to use your Ubuntu system as a local resolver or as a DNS forwarder. The installation of the tool will help the servers to authenticate requests and pass them to an upstream server. If you are looking for a complete guide that contains information about the tool and its installation, then read this blog to secure DNS servers.

How Can Encrypting DNS Traffic Help?


There are plenty of security packages available for Ubuntu 14.04 or 14.10 and all of them generally use 127.0.0.2 as the local IP address. The pre-defined local IP address ensures that the utility should not interfere with Ubuntu's default setup. It is one of the tools that encrypt web traffic and offers outstanding security by using a dedicated system user approach for every package. Some tech experts also state that using US based OpenDNS resolver to secure DNS servers can be highly dangerous because it records all the online activities of the user. Additionally, several vulnerabilities in the tool may also hijack the browser’s homepage and redirects URLs to its own malicious servers.

Steps to Install DNSCrypt in Ubuntu via PPA Package


1.       Install dnscrypt-proxy in Ubuntu by using the following commands:

“sudo add-apt-repository ppa:anton+/dnscrypt
sudo apt-get update
sudo apt-get install dnscrypt-proxy”

2.       After installing the tool, set your DNS server’s  network connection to ‘127.0.0.2’

3.       Go to ‘Network Manager’ indicator and select ‘Edit Connections’ option

4.       Now, select the desired connection and click ‘Edit’ option

5.       Look out for the ‘IPv4 Settings’ tab and enter ‘127.0.0.2,’ under ‘DNS servers’ section and then click ‘Save,’ after selecting the ‘Manual’ method
dnscrypt-proxy

6.       You can also select ‘Automatic (DHCP)’ method,  select ‘Automatic (DHCP) addresses only’ option, enter ‘127.0.0.2,’ under ‘DNS servers’ section and then click ‘Save’

dnscrypt-proxy
7.       Restart your network connection by selecting Network indicator > Enable Networking twice to disable > and then re-enable it

8.       Check that the ‘127.0.0.2’ DNS is actually in use by visiting Network indicator > Connection Information.


How to Confirm That the ‘dnscrypt-proxy’ is Working?

Since the dnscrypt-proxy packages don't use actual OpenDNS codes, a user will not be able to confirm that the DNS servers are using "dig txt debug.opendns.com" command. Additionally, machines running ‘dnscrypt-proxy’ tool cannot visit OpenDNS' test pages to perform a DNS check. However, you can visit www.dnsleaktest.com and run a DNS check to confirm the operations of the ‘dnscrypt-proxy’ package resolver.
dnscrypt-proxy

Additionally, you can also run the “sudo tcpdump -i NETWORK-INTERFACE dst host 176.56.237.171” command to check that the ‘dnscrypt-proxy’ is working. After running the command, visit a website in your web browser, and the command output will appear like this:
dnscrypt-proxy

Conclusion 


Always remember that the tweaks mentioned above will only function on systems running on Ubuntu 14.10, 14.04 and 12.04. Although securing DNS connections are quite difficult, but every user should encrypt web traffic to ensure complete safety of data, files, and other online stuff. Preventing virtual attacks is quite challenging as the malware authors are coming up with smart programs to snoop into your network connections. If you think that your device and online accounts carries some sensitive files and documents, then install the tool right now to enjoy secure DNS access.

Friday, 27 March 2015

iPhone Configuration Utility Tips for Using iOS Devices Securely


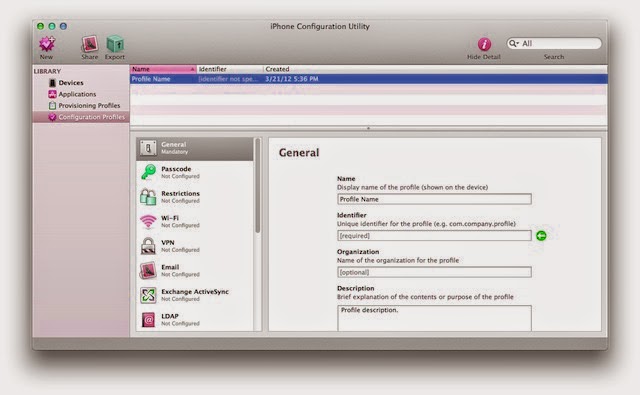
iPhone Configuration Utility Tech experts state that using self-signed SSL (Secure Socket Layer) certificates can offer basic protection against malicious threats, but you may need to change iPhone security and privacy settings. SSL certificates aren’t too costly to purchase, but it is better to create some of your own to enjoy customized protection. Self-signed SSL certificates can create security-related certificates for free, without paying fees to the digital certificate issuing body Certificate Authority (CA) or engaging in any auditing requirements. Since self-signed certificates will not be able to convince your browsers to trust websites automatically, read the tips on how to setup iOS for self-signed certificates.

1.       Never Accept Self-Signed Certificate in Mobile Safari

Self-Signed Certificate  
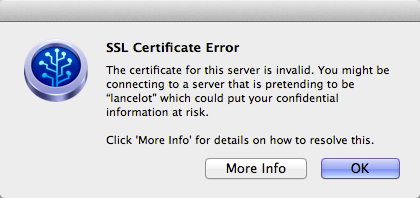
Undoubtedly, self-signed permissions offer basic protection against malicious threats, but the tool also has some significant downsides. Accepting the personal security certificate in Safari will just add an SSL exception that will restrict the browser from warning you about the health of a website. It will not install the settings as a trusted certificate on iOS, and some of the iPhone apps may fail to connect to the site. If you’re an iOS 7 user, then think twice before adding a personally signed certificate. It is just because once the SSL exception gets added; you will not be able to remove it.

2.       Install Certificates as an iOS Configuration Profile

iOS Configuration Profile 
All Apple users can add an SSL certificate to the trusted list by emailing the configuration profile file as an attachment. You can then select ‘Install to add the certificate’ option to use it without getting constant warnings in Safari or other iOS/iPhone apps. The best part of the tips is that you can access the SSL certificate any time and can remove it by visiting Settings->General->Profiles > and then Delete. You can download and install iPhone configuration utility for Mac and PC to create your personally signed certificates. The utility functions serve as an ideal option if you can’t access your email from your iOS device or have too many gadgets to manage.

3.       Never Create Self-Signed Certificates Within IIS


Although, you may find it easy to create self-signed certificates in IIS (short for Internet Information Services), but sometimes the computer name will not match the intended hostname. Additionally, the final certificate will use the computer name as the hostname, and your iOS device may deny accepting them. 

4.       Try Creating Certificates With OpenSSL

Certificates With OpenSSL

 Open the OpenSSL command line tool to create a self-signed certificate because you can utilize the settings or programs installed by default on Mac OS X. To begin, type “openssl genrsa -out myselfsigned.key 2048” command to create a private key file. Now, run “openssl req -new -x509 -key myselfsigned.key -out myselfsigned.cer -days 365 -subj /CN=www.mysite.com” command to create the self-signed certificate. Additionally, you can use some popular websites to create the certificates, but downloading OpenSSL is the most secure option.

5.       Create a Personal Certificate Authority (CA)


Self-signed certificates require you to set up trust relationships for every certificate on each iOS device you use. Your own Certificate Authority (CA) can create multiple certificates, and you can add custom features to the profiles to meet your desired requirements. As a result, the iOS devices will automatically trust certificates based on your root CA certificate. You can also install the Personal Certificate Authority (CA) guidelines on a web server and access it from any iOS device to ensure safer online environment.

Conclusion


Apple’s iPhone Configuration Utility is an amazing tool that helps Apple device users to distribute configuration profiles easily and securely.  An employee having an iPhone, iPad, iPod Touch, or other iOS devices can easily tweak the iPhone settings and install the utility to get desired results. Since iPad configuration may differ from that of an iPhone, the company has also released iPad Configuration Utility to manage different versions of your iOS slates. Managing iPhone security is becoming a stiff challenge for Apple users because malware authors are constantly releasing malicious codes to infect company’s highly secure virtual environment.

Thursday, 26 March 2015

Expert Online Tech Support to Fix 0x80070057 Windows Error


All of us will agree that Windows 7 is one of the most successful versions of Windows operating system but it is not immune from common errors that you might face. Introduced in October 2009, it was considered as a successor of highly successful Windows XP. During the last many years, Microsoft has ruled the computing community with an overwhelming presence, with its innovating products. But it is also a truth that every PC running Windows is prone to common errors that might disrupt your productivity remarkably. But don’t worry you can handle these errors easily if you know the right way of troubleshooting. 0x80070057 error is one of the most faced errors today that you face when you back up files in your Windows 7 PC. 

How Online Tech Support Helps in Resolving 0x80070057 Error?

 
0x80070057

 The technology of the Internet has influenced every walk of life and PC troubleshooting is not an exception to that. Today by using Internet connection you can avail premium technical support from the comfort of your home. Many still delve in confusion and feel fear while thinking of technical support.  But if once you go for it then you would like to use it every time because of the amazing convenience and benefits it offers to users.
If you are facing the 0x80070057 error and don’t want to fix it at your own, then experts advise of opting to online tech support. To avail the same, you simply have to dial the toll-free number of the service provider and in the next moment you will be connected to a tech support guy. The tech support guy, having profound knowledge and experience of troubleshooting Windows errors will listen to your issue carefully and then access your PC through a secure remote desktop connection. Rest assured about the security because he will not perform any step on your PC without taking your prior approval. 

But if you are an advanced PC user and confident of performing steps to troubleshoot your PC, then you have landed on the right blog. In this blog, we will share information and tips of troubleshooting 0x80070057 error by using a few simple steps. But first you should understand what 0x80070057 error is all about. 

Symptoms of 0x80070057 Error

 technical support


You face this error on your PC while you are using Windows Backup tool on your PC running Windows 7. You use this tool for backing up files. All of sudden you realize that the backup fails, and you get notified regarding the issue through the following message: 

“An internal error has occurred: The parameter is incorrect: (0x80070057)”

How to troubleshoot 0x80070057 Error?


You can troubleshoot this error through two different methods. Both the methods are described below one-by-one. 

Method I: 


The first method to troubleshoot the error is about changing the decimal symbol setting. It is an important step because if the decimal symbol is not set to '.' (dot) then, this issue is likely to take place. You need to change the decimal symbol setting by following the steps given below. 

Follow the steps given below to fix the error: 


·         First of all, you need to open the Control Panel and then click Clock, Language, and Region and then finally click Region and Language

·         Next, you need to click the Formats tab, and then click Additional settings

·         Now go into the Decimal symbol filed and then type. (dot), and then click OK twice

·         Now restart the computer.

·         Here you need to take into consideration that third party software may also be responsible for the error as they might make changes to the runtime locale of the PC and then modify settings in Control Panel. 


Method II:


The second method to troubleshoot the error suggests adding registry key value.
Some serious issues might take place if you make changes to the registry in an appropriate manner by using either registry editor or any other method. You can get rid of these issues only after reinstalling the operating system. However, it can’t be assumed that through this method you can solve the problem, so you modify the registry at your risk. 

Follow the below-mentioned steps to fix the error through registry modification: 


·         Click Start button and then type Regedit.exe and the Search box and then hit ENTER

·         Now identity and click the following registry subkey:

·         HKEY_LOCAL_MACHINE\SOFTWARE\Policies\Microsoft\System

·         Go to the Edit menu and point to New, and then click DWORD Value.

·         Now type CopyFileBufferedSynchronousIo and then press ENTER

·         Oncee again take your cursor on CopyFileBufferedSynchronousIo and then right-click and then click Modify

·         Now you have to type 1 in the value data box and then click OK.
 
·         Finally exit from the Registry. 


These are the two different methods of troubleshooting 0x80070057 error in your Windows 7 PC. Most probably, the steps mentioned above will fix the issue, and you will be able to backup files in your PC but if the error continues to appear then there might be something alarming. In such situations, calling a technical support services looks the best option. By calling an online support service, you get instantly connected to a tech support guy, who will help you in getting the issue resolved.