
Windows 8 is the one of the most popular operating systems by Microsoft. Windows Apps Store has a lot of new applications that you can use for various purposes. Sometimes, Windows 8 might show you the error message “The Remote Procedure Call Failed” when you try to access new apps from the store. Read the blog to understand the error and fix the issue with the help of below mentioned troubleshooting steps.
1. “The Remote Procedure Call Failed” error might occur due to an incorrect allocation of registry entries.
2. Windows will show you the error if, the remote procedure calls service is not working properly or not set as automatic.
3. The error might occur when the user runs the cleanup software.
1. Click 'Start.'
2. Press the ‘Windows’ key and the letter ‘R’ key together to open ‘Run’ dialog box.
3. Type ‘services.msc’ in ‘Run’ dialog box.
4. Press ‘Enter.’
5. Below mention screen will pop up.

6. Now look for the ‘Remote procedure call service.’
7. Right-click on ‘Remote Procedure Call.’
8. Click ‘Properties.’
9. Ensure that the ‘service status’ is running and ‘startup type’ is set to automatic.
10. If the ‘start type service’ is not set to automatic then select ‘startup type’ as automatic.
11. Click ‘Start.’
12. Click ‘Apply’ and ‘OK.’
Restart your computer and check whether the problem got fixed or not. If not, then ‘Run system file checker’ to fix the problem. System file checker is the utility that helps the user to scan the windows for corrupted and missing files. If you are good with computers then, follow the below mentioned steps to troubleshoot the problem, or you can call computer support companies for online technical support.
1. Swipe in from the right edge of the screen.
2. Then, tap search.
3. Point to the lower-right corner of the screen, if you are using a mouse.
4. Type ‘Command Prompt’ in the search box as mentioned below in the image.

5. Right-click on the ‘Command Prompt.’
6. Click ‘Run as administrator.’

7. Command Prompt window will open.
8. Type ‘sfc/scannow’ in ‘Command Prompt’ window.
9. Press ‘Enter.’
All the protected files will get scanned by ‘scannow command prompt’ and the corrupted files will be replacing with a cached copy compressed folder that is located at “%WinDir%\System32\dllcache” folder.
Note: it’s recommendable that, not to close the command prompt windows until the verification process is complete, and the Windows will show you the scan results when the process gets finished.
You will receive the one of the following message after the scanning process is finished.
1. “Windows Resource Protection did not find any integrity violations.” It means that you do not have any corrupt or missing files.
2. “Windows Resource Protection could not perform the requested operation.” It means that some important files are missing or corrupted, and you need to run System File Checker scan in ‘Safe Mode.’
1. Press the ‘Power button’ at the Settings charm.
2. Then, press and hold the ‘SHIFT key’ on your keyboard.
3. Click ‘Restart.’

4. In the next option, Windows will show you three options, and you need to choose the ‘Troubleshoot’ and press it.

5. Press ‘Advanced options’ in the troubleshoot screen.

6. Press ‘Startup Settings’ in the ‘Advanced Options’ screen.

7. Windows will inform you to restart after enabling ‘Safe Mode’ option And then press ‘Restart.’
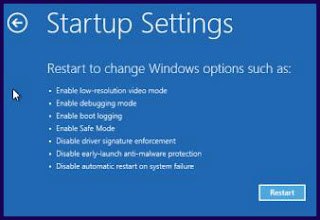
8. In the next screen, Windows will display you nine startup settings to choose. The options are- 'Safe Mode,' 'Safe Mode with Networking' and 'Safe Mode with Command Prompt.'

9. Press, the 'F4' key on your keyboard, to enable Safe Mode.
Before performing this step ensure that the ‘PendingRenames’ and ‘PendingDeletes’ folders exist under “%WinDir%\WinSxS\Temp.” Now you need to follow the troubleshooting step one to run the system file checker.
Restart your computer and check whether the problem got fixed or it if it persists. If you are unable to repair the problem, then it is advisable to contact online technical support firms for further tech support. It might be a possibility that the registry files of your system are not working properly, and you need to reset them again.
“The Remote Procedure Call Failed” mostly occurs if the remote procedure call service is not working properly or not set as automatic. You can fix the problem on your own with the help of above mentioned troubleshooting steps. If the problem prevails then, it might be possible that a few applications, programs or services of your Windows 8 PC are not working properly.
In such situations, it’s advisable to contact online computer support firms for help. The tech support team will fix the problem with the help of remote secured session and diagnose your system completely after fixing the problem.
Causes of the Error
1. “The Remote Procedure Call Failed” error might occur due to an incorrect allocation of registry entries.
2. Windows will show you the error if, the remote procedure calls service is not working properly or not set as automatic.
3. The error might occur when the user runs the cleanup software.
Resolution
Troubleshoot Method One:
1. Click 'Start.'
2. Press the ‘Windows’ key and the letter ‘R’ key together to open ‘Run’ dialog box.
3. Type ‘services.msc’ in ‘Run’ dialog box.
4. Press ‘Enter.’
5. Below mention screen will pop up.

6. Now look for the ‘Remote procedure call service.’
7. Right-click on ‘Remote Procedure Call.’
8. Click ‘Properties.’
9. Ensure that the ‘service status’ is running and ‘startup type’ is set to automatic.
10. If the ‘start type service’ is not set to automatic then select ‘startup type’ as automatic.
11. Click ‘Start.’
12. Click ‘Apply’ and ‘OK.’
Restart your computer and check whether the problem got fixed or not. If not, then ‘Run system file checker’ to fix the problem. System file checker is the utility that helps the user to scan the windows for corrupted and missing files. If you are good with computers then, follow the below mentioned steps to troubleshoot the problem, or you can call computer support companies for online technical support.
Troubleshoot Method Two: Run system file checker
1. Swipe in from the right edge of the screen.
2. Then, tap search.
3. Point to the lower-right corner of the screen, if you are using a mouse.
4. Type ‘Command Prompt’ in the search box as mentioned below in the image.

5. Right-click on the ‘Command Prompt.’
6. Click ‘Run as administrator.’

7. Command Prompt window will open.
8. Type ‘sfc/scannow’ in ‘Command Prompt’ window.
9. Press ‘Enter.’
All the protected files will get scanned by ‘scannow command prompt’ and the corrupted files will be replacing with a cached copy compressed folder that is located at “%WinDir%\System32\dllcache” folder.
Note: it’s recommendable that, not to close the command prompt windows until the verification process is complete, and the Windows will show you the scan results when the process gets finished.
You will receive the one of the following message after the scanning process is finished.
1. “Windows Resource Protection did not find any integrity violations.” It means that you do not have any corrupt or missing files.
2. “Windows Resource Protection could not perform the requested operation.” It means that some important files are missing or corrupted, and you need to run System File Checker scan in ‘Safe Mode.’
Follow the steps to enter ‘Safe Mode’ in Windows 8:
1. Press the ‘Power button’ at the Settings charm.
2. Then, press and hold the ‘SHIFT key’ on your keyboard.
3. Click ‘Restart.’
4. In the next option, Windows will show you three options, and you need to choose the ‘Troubleshoot’ and press it.

5. Press ‘Advanced options’ in the troubleshoot screen.
6. Press ‘Startup Settings’ in the ‘Advanced Options’ screen.

7. Windows will inform you to restart after enabling ‘Safe Mode’ option And then press ‘Restart.’

8. In the next screen, Windows will display you nine startup settings to choose. The options are- 'Safe Mode,' 'Safe Mode with Networking' and 'Safe Mode with Command Prompt.'

9. Press, the 'F4' key on your keyboard, to enable Safe Mode.
Before performing this step ensure that the ‘PendingRenames’ and ‘PendingDeletes’ folders exist under “%WinDir%\WinSxS\Temp.” Now you need to follow the troubleshooting step one to run the system file checker.
Restart your computer and check whether the problem got fixed or it if it persists. If you are unable to repair the problem, then it is advisable to contact online technical support firms for further tech support. It might be a possibility that the registry files of your system are not working properly, and you need to reset them again.
Conclusion
“The Remote Procedure Call Failed” mostly occurs if the remote procedure call service is not working properly or not set as automatic. You can fix the problem on your own with the help of above mentioned troubleshooting steps. If the problem prevails then, it might be possible that a few applications, programs or services of your Windows 8 PC are not working properly.
In such situations, it’s advisable to contact online computer support firms for help. The tech support team will fix the problem with the help of remote secured session and diagnose your system completely after fixing the problem.
No comments:
Post a Comment